ダイアログを使用して取引支援ツールを作る(2)
前回のつづき。
今回は、ダイアログの中に任意のコンポーネントを配置して、クリック時に処理を実行するところまでコーディングする。
とりあえず、前回のコードを流用してボタンをダイアログ内に配置する。
#property copyright "nisai"
#property link      "https://nisaifx.com"
#property version   "1.00"

#include <Controls/Dialog.mqh>
//ボタンをインクルード
#include <Controls/Button.mqh>

CAppDialog dialog;
//ボタンを宣言
CButton button;

int OnInit(){
   dialog.Create(0, "Dialog", 0, 20, 20, 300, 300);

   //ボタンを生成
   button.Create(
      0,                      //表示させるチャート(0なら現在のチャート)
      dialog.Name()+"Button", //ボタンの名前
      0,                      //表示させるウィンドウ
      10,                     //左上のX座標
      10,                     //左上のY座標
      100,                    //右下のX座標
      40                      //右下のY座標
   );

   //ボタンのテキストを設定
   button.Text("ボタン");

   //ボタンの文字色・背景色・枠線色を設定
   button.Color(clrWhite);
   button.ColorBackground(clrBlue);
   button.ColorBorder(clrBlue);

   //ダイアログにボタンを追加
   dialog.Add(button);

   dialog.Run();
   return(INIT_SUCCEEDED);
}

void OnChartEvent(const int id,
                  const long& lparam,
                  const double& dparam,
                  const string& sparam){
   dialog.ChartEvent(id,lparam,dparam,sparam);
}

void OnDeinit(const int reason){
   dialog.Destroy(reason);
}
実行してみる。

ボタンが表示された。
ダイアログを構成するオブジェクトなので、ボタンの名前もダイアログの接頭辞を付けておいたが、これは必須ではない。
ダイアログに対してちゃんとAddされていれば、ダイアログを構成するオブジェクトとして登録され、ダイアログが消えればボタンも一緒に消える。
続いて、ボタンがクリックされた時の処理を書く。
例によってOnChartEventの中で、クリックイベントがボタンに対して発生したかどうかを判定し、処理を行う。
#property copyright "nisai"
#property link      "https://nisaifx.com"
#property version   "1.00"

#include <Controls/Dialog.mqh>
#include <Controls/Button.mqh>

CAppDialog dialog;
CButton button;

int OnInit(){
   dialog.Create(0, "Dialog", 0, 20, 20, 300, 300);

   button.Create(0,dialog.Name()+"Button",0,10,10,100,40);

   button.Text("ボタン");
   button.Color(clrWhite);
   button.ColorBackground(clrBlue);
   button.ColorBorder(clrBlue);

   dialog.Add(button);

   dialog.Run();
   return(INIT_SUCCEEDED);
}

void OnChartEvent(const int id,
                  const long& lparam,
                  const double& dparam,
                  const string& sparam){
   dialog.ChartEvent(id,lparam,dparam,sparam);
   //クリックイベントがボタンに対して発生したか判定
   if(id==CHARTEVENT_OBJECT_CLICK && sparam==dialog.Name()+"Button"){
      Alert("ボタンがクリックされた");
   }
}

void OnDeinit(const int reason){
   dialog.Destroy(reason);
}
実行し、ボタンをクリックしてみる。
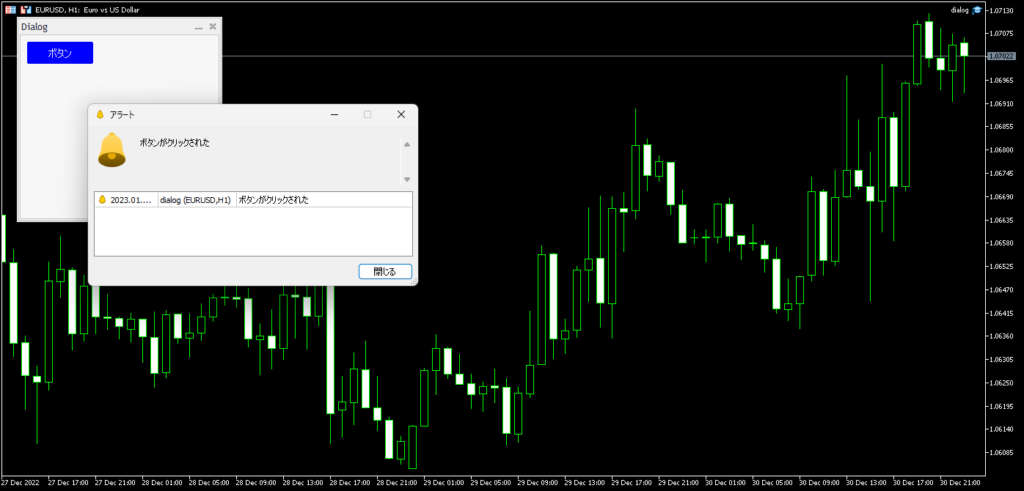
正しく動作した。
ちょっと脇に逸れて、mql5.com(MQLの公式サイト)でサンプルとして書かれているコードについて触れておく。
mql5.comのドキュメントでは、ダイアログなどの使い方を紹介するサンプルコードは、全てダイアログを継承した独自クラスを定義しており、前述のように直接CAppDialogを使用していない。
別にどちらでも構わないのだが、EAやインジケータの作成ではクラス定義というものを行わないことも多いため、独自クラス定義からスタートすると少々とっつきにくく感じるかもしれないと思い、ここまでは公式のサンプルに沿わない形でコーディングした。
公式のサンプルに沿い、CAppDialogを継承した独自クラスを定義して、前述のソースコードを書き直してみる。
またサンプルに従って、オブジェクト生成や色などの変更操作時の戻り値を確認し、どこかで失敗している場合はOnInitで弾くようにする。
#property copyright "nisai"
#property link      "https://nisaifx.com"
#property version   "1.00"

#include <Controls/Dialog.mqh>
#include <Controls/Button.mqh>

//CAppDialogを継承する独自クラスMyDialogを定義
class MyDialog:public CAppDialog{
private:
   //privateメンバとしてボタンを持たせる
   CButton button;
public:
   //WndのCreate、OnEventをオーバーライド(実装は下の方に)
   virtual bool Create(const long chart,const string name,const int subwin,const int x1,const int y1,const int x2,const int y2);
   virtual bool OnEvent(const int id,const long &lparam,const double &dparam,const string &sparam);
protected:
   //ボタンのCreate関数の宣言(実装は下の方に)
   bool CreateButton(void);
};

//イベントハンドラの登録(OnEventの実装)
EVENT_MAP_BEGIN(MyDialog)
   //buttonにON_CLICKが発生したら、OnClickButton関数(実装は下の方に)を呼ぶ
   ON_EVENT(ON_CLICK,button,OnClickButton)
EVENT_MAP_END(CAppDialog)

//ダイアログのCreate関数を実装
bool MyDialog::Create(const long chart,const string name,const int subwin,const int x1,const int y1,const int x2,const int y2){
   //CAppDialogを生成
   if(!CAppDialog::Create(chart,name,subwin,x1,y1,x2,y2))
      return(false);
   //ボタンを生成
   if(!CreateButton())
      return(false);
   return(true);
}

//ボタンのCreate関数を実装
bool MyDialog::CreateButton(void){
   if(!button.Create(
      m_chart_id,       //m_chart_id:Wndが持つメンバー変数。ここではMyDialogのチャートIDを指す。
      m_name+"Button",  //m_name:Wndが持つメンバー変数。ここではMyDialogの名前を指す。
      m_subwin,         //m_subwin:Wndが持つメンバー変数。ここではMyDialogのウィンドウIDを指す。
      10, 10, 100, 40))
      return(false);
   if(!button.Text("ボタン"))
      return(false);
   if(!button.Color(clrWhite))
      return(false);
   if(!button.ColorBackground(clrBlue))
      return(false);
   if(!button.ColorBorder(clrBlue))
      return(false);
   //MyDialogにボタンを追加
   if(!Add(button))
      return(false);
   return(true);
}

//ボタンに登録するコールバック関数の実装
void OnClickButton(){
   Alert("ボタンがクリックされた");
}

MyDialog dialog;

int OnInit(){
   if(!dialog.Create(0, "Dialog", 0, 20, 20, 300, 300))
      return(INIT_FAILED);
   if(!dialog.Run())
      return(INIT_FAILED);
   return(INIT_SUCCEEDED);
}

void OnChartEvent(const int id,
                  const long& lparam,
                  const double& dparam,
                  const string& sparam){
   dialog.ChartEvent(id,lparam,dparam,sparam);
}

void OnDeinit(const int reason){
   dialog.Destroy(reason);
}
書き方は違うが、結局はCAppDialogを生成しているので、全く一緒だ。
当然、実行結果も全く同じになる。
以降このコードを使っていく。
次回は、もう少し具体的なコンポーネントの配置とポジション操作等を行う。